Search

Frozen Yoghurt Bark with Granola and Plum

Frozen Yoghurt Bark is one of my favourite snacks for when you’re craving something sweet after dinner but don’t want to splurge too much. I don’t know what it is about things when they’re frozen, but they always seem more indulgent that their unfrozen counterparts. What’s best about this recipe though, is that it requires virtually zero effort to prepare and can be easily customised to your likings!

Table of Contents

What is Yoghurt Bark and How Do You Make?

Yoghurt Bark is simply yoghurt that is spread onto a tray, scattered with whatever toppings you like and frozen for a few hours. That’s all. However, I’ve added a couple more steps to get you the best results possible.

The way I make yoghurt bark is as follows:

Step 1 - Simmer Fruit with Sugar Until Broken Down

Cooked Plums

Step 2 - Spread Yoghurt onto a Tray Lined with Baking Paper

Yoghurt spread on a tray

Step 3 - Top Yoghurt with Fruit and Granola

Yoghurt spread on a tray being sprinkled with granola
Yoghurt spread on a tray topped with granola and plums, being drizzled with plum syrup

Step 4 - Freeze Until Firm

Frozen yoghurt bark

Why Do You Have to Cook the Fruit?

You don’t have to cook the fruit, in fact, most other yoghurt bark recipes I’ve seen simply slice fresh fruit and add it on top. I don’t particularly love this method though, as the high water content in most fresh fruits makes it freeze solid like an icy brick. This can be quite unpleasant to eat as the texture is just so different from the yoghurt and is especially displeasing if you have sensitive teeth.

This is why I cook the fruit down slightly with a bit of sugar before adding it to the yoghurt. For one, some of the water is evaporated away by the heat. Second, the added sugar reduces the freezing temperature. Both of these mean the fruit is softer and easier to bite into when eaten straight from the freezer which is much better than teeth shatteringly hard.

It’s totally up to you whether you want to go through this extra step or not, but I can assure you, the extra 5 minutes in the process is well worth it.

How Long Will it Keep in the Freezer?

In an airtight container, yoghurt bark will last perfectly in the freezer for around 2-3 months. If you are planning on making a few batches, make sure you don’t just leave them in the freezer on the tray uncovered. Because of the fat content in yoghurt, it’ll suck up any flavours and aromas that are circling in your freezer, which you don’t want.

So, it’s important to remove it from the freezer once it has completely frozen, cut it up into individual pieces, and box them up in an air-tight and freezer safe container. Plus, when you store them this way, they’re much easier to quickly grab and snack on.

Why is my Yoghurt Bark Icy?

The reason for iciness in frozen desserts is due to water content. This doesn’t mean that you’ve added water to the recipe, but every natural product that is in the slightest bit, for the lack of a better word, wet, has water in it – be it milk, cream, vegetables or even meat, or in our case, yoghurt.

Therefore, the lower the water content in your yoghurt, the less icy, and more creamy and smooth it’ll be. That’s why you want to use a nice thick yoghurt for this recipe. For a general rule, I like to use a yoghurt that holds it’s shape on the spoon, rather than drizzles off in a soupy mess.

If you can’t find a thick one that you like or would just prefer to make it with a particular yoghurt, you can try straining it. For this, all you have to do is pour your yoghurt into a muslin cloth, then either tie it up somewhere or rest it in a sieve, over a bowl and leave it to drain for an hour or 2. The longer you leave it, the more whey (watery part in yoghurt) will separate from the yoghurt.

If you’ve ever heard of labneh or yoghurt cheese, this is the process used to make it, but just with unsweetened yoghurt instead.

In saying that, if you only have natural yoghurt in your fridge and would like to give this a go, feel free to strain that then sweeten it to your liking afterwards.

Yoghurt Bark broken up in a pink love heart shaped bowl

What Yoghurt Should I Use?

As I said before, you want a thick yoghurt for this recipe with a lower water content. Some of my all time favourite yoghurts that fit the brief perfectly for this one are:

Is Yoghurt Bark Healthy?

Like anything, not all yoghurt bark is healthy and will come down to the yoghurt and toppings you use. If you use a heavily sweetened yoghurt and cover it in chocolate and caramel, of course it won’t be good for you. But one that is topped with fruit and is only lightly sweetened will be a healthy option for a sweet snack.

I typically buy natural yoghurt and sweeten it myself so I can control the sugar, but I have used pre-sweetened yoghurt in this recipe to make it easier. The decision is totally up to you.

FAQs

How Long Does it Take to Freeze?

Depending on your freezer on how thinly you spread it, it should take no longer than 3 hours to freeze.

Can I make it Sugar Free?

Absolutely! Just buy unsweetened, natural yoghurt and sweeten it slightly with a sweetener like Stevia.

Can I Make it Gluten Free?

Yep! Just skip out on the granola.

Can I Make it Lactose Free?

You sure can! Just use a dairy free or lactose free yoghurt.

Video

Frozen Yoghurt Bark with Plum and granola

Frozen Yoghurt Bark with Granola and Plum

Frozen Yoghurt Bark is one of my favourite snacks for when you're craving something sweet after dinner but don't want to splurge too much. What's best about this recipe though, is that it requires virtually zero effort to prepare and can be easily customised however you like!
Prep Time 10 minutes
Course Dessert
Servings 6 pieces

Ingredients
  

  • 1 cup Full Fat Greek Yoghurt (sweetened)
  • ½ cup Granola
  • 3 Plums (diced)
  • ½ tbsp Sugar
  • 1 tbsp Honey (if using unsweetened yoghurt)

Instructions
 

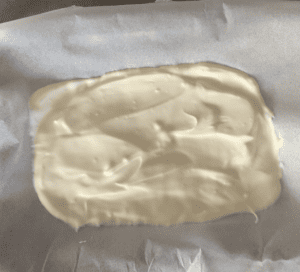
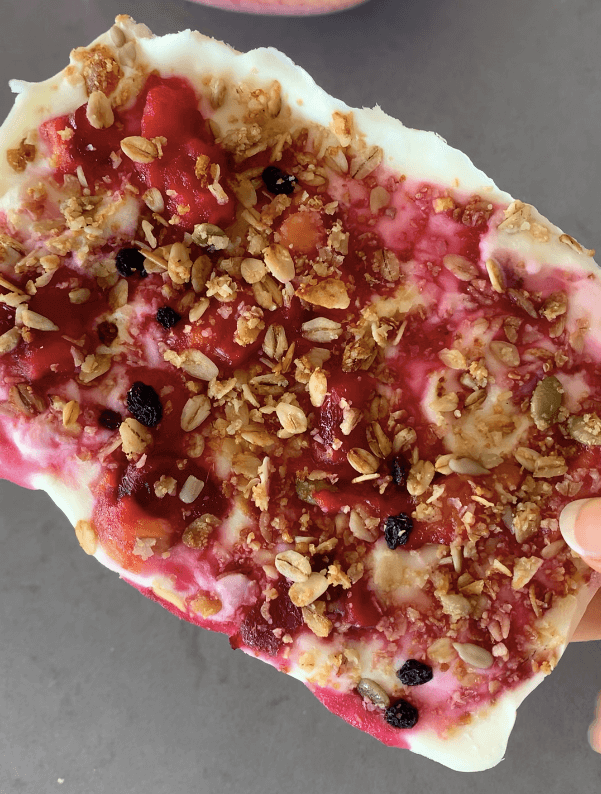
  • Line a lipped tray or shallow container with baking paper.
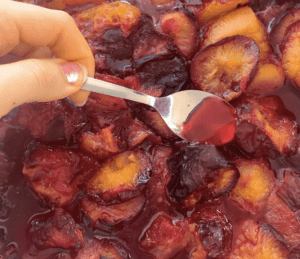
  • Add the plums and sugar to a saucepan set over a medium heat.
  • Simmer for about 5 minutes until the fruit has broken down and a syrupy sauce has formed. Transfer it to a bowl and set in the fridge until cool. 
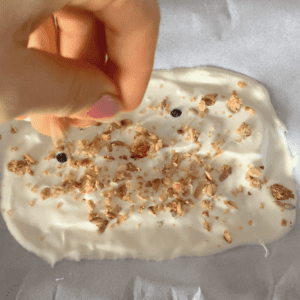
  • Using a palette knife, spatula or large spoon, spread the yoghurt in a thin layer (roughly 1cm thick) onto the prepared tray.
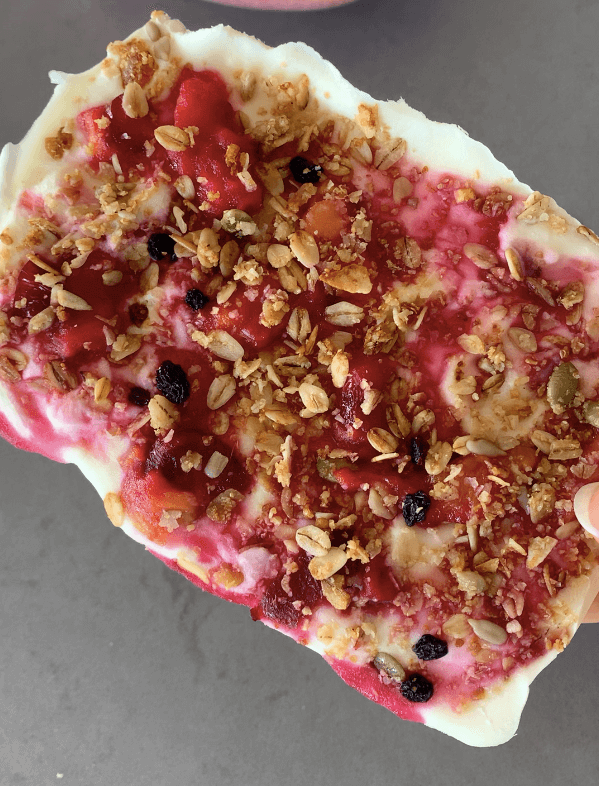
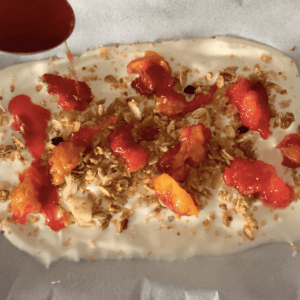
  • Sprinkle evenly with granola and dot pieces of plum all over. Drizzle some of the sauce on top as well.
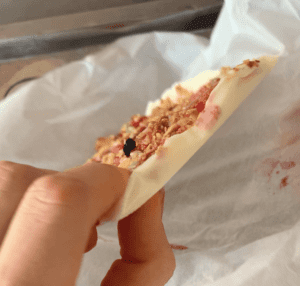
  • Carefully pop the tray in the freezer and leave for 2-3 hours until firm.
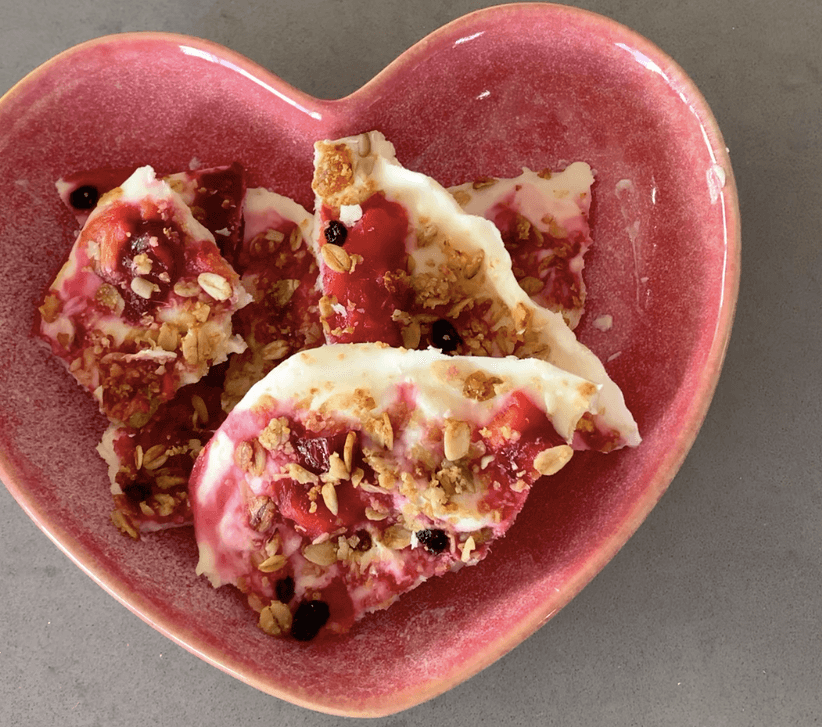
  • Remove from the freezer and either cut or snap into smaller pieces, then serve!

OTHER RECIPES YOU’LL LOVE!

Hey! I’m Montana...

Mon Mack Food is my little space to share my passion for food. It is also a place to document the recipes I’ve created while cooking for friends and family! While it is now just a hobby, my absolute dream is to build this project into something I can one day call my job 🙂

Sign up to get the latest recipe inspiration straight to your inbox!
RECENT POSTS
Search